Electrical Projects

contains electrical projects

Abstract

One of the first and most widely used application of power electronic devices have been in rectification. Rectification refers to the process of converting an ac voltage or current source to dc voltage and current. Rectifiers specially refer to power electronic converters where the electrical power flows from the ac side to the dc side. In many situations the same converter circuit may carry electrical power from the dc side to the ac side where upon they are referred to as inverters. We will be Designing and Simulating single phase half wave Rectifier; commonly used rectifier circuits supplying different types of loads (resistive, inductive, capacitive, back emf type) will be presented.

Contents

  • Introduction……………………………………………
  • Objectives of the Project…………………………..
  • Point of interests
  • Circuit Description & Operation………………..
  • Mathematical Analysis…………………………….
  • Computer simulation
    • Software Code
    • Sample Run
    • Outputs
      • Circuit
      • Outputs
      • Block Diagram
      • Outputs

1.      MATLAB Simulation

2.      MATLAB Simulink (Time Domain Implementation)

3.      MATLAB Simulink (Frequency Domain Implementation)

4.      Multisim Implementation…………………………


Introduction

Single phase rectifiers are extensively used in a number of power electronic based converters. In most cases they are used to provide an intermediate unregulated dc voltage source which is further processed to obtain a regulated dc or ac output. They have, in general, been proved to be efficient.


Objectives of the Project:

  • Analyze the operation of single phase half wave rectifier supply resistive, inductive loads.
  • Define and calculate the Performance Parameters of the rectifier.
  • Simulate the circuit with computer software package (MATLAB)
  • In addition to MATLAB we also simulated the project in Multisim


Points of interest in the analysis will be.

•   Waveforms and characteristic values (average, RMS etc) of the rectified voltage and current.

•   Influence of the load type on the rectified voltage and current.

•   Reaction of the rectifier circuit upon the ac network, reactive power requirement, power factor, harmonics etc.

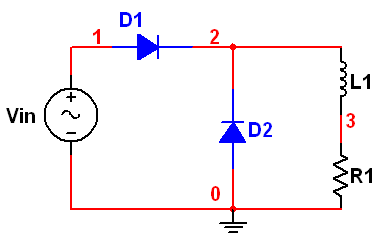
Circuit Description & Operation:

Let the source voltage vs be defined to be E*sin (wt). The source voltage is positive when 0 < wt < pi  radians and it is negative when pi < wt < 2 pi radians. When vs is positive, diode D1 conducts and the voltage vc is positive. This in turn leads to diode D2 being reverse-biased during this period. During  pi < wt < 2 pi the voltage vc would be negative if diode D1 tends to conduct. This means that D2 would be forward-biased and would conduct. When diode D2 conducts, the voltage vc would be zero volts, assuming that the diode drop is negligible. Additionally when diode D2 conducts, diode D1 remains reverse-biased, because the voltage vs is negative. When the current through the inductor tends to fall, it starts acting as a source. When the inductor acts as a source, its voltage tends to forward bias diode D2 if the source voltage vs is negative and forward bias diode D1 if the source voltage vs is positive. Even when the source voltage vs is positive, the inductor current would tend to fall if the source voltage is less than the voltage drop across the load resistor. During the negative half-cycle of source voltage, diode D1 blocks conduction and diode D2 is forced to conduct. Since diode D2 allows the inductor current circulate through L, R and D2, diode D2 is called the free-wheeling diode. We can say that the current free-wheels through D2.

Mathematical Analysis

An expression for the current through the load can be obtained as shown below. It can be assumed that the load current flows all the time. In other words, the load current is continuous. When diode D1 conducts, the driving function for the differential equation is the sinusoidal function defining the source voltage. During the period defined by pi < wt < 2pi, diode D1 blocks current and acts as an open switch. On the other hand, diode D2 conducts during this period, the driving function can be set to be zero volts. For 0 < wt <pi, the equation (1) shown below applies.

For the negative half-cycle of the source, equation (2) applies. As in the previous case, the solution is obtained in two parts. The expressions for the complementary integral and the particular integral are the same. The expression for the complementary integral is presented by equation (3). The particular solution to the equation (1) is the steady-state response and is presented as equation (4). The total solution is the sum of both the complimentary and the particular solution. The total solution is presented as equation (5).

The difference in solution is in how the constant A in complementary integral is evaluated. In the case of the circuit without free-wheeling diode, i(0) = 0, since the current starts building up from zero at the start of every positive half-cycle. On the other hand, the current-flow is continuous when the circuit contains a free-wheeling diode also. Since the input to the RL circuit is a periodic half-sinusoid function, we expect that the response of the circuit should also be periodic. That means, the current through the load is periodic. It means that i(0) = i(2).

Since the current through the load free-wheels during  <  < 2, we get equation (6). We use ( -  ) for the elapsed period in radians instead of  itself, since the free-wheeling action starts at  =  . From the total solution, we can get i() from equation (7) by substituting  = . To obtain A, the following steps are necessary. From the total solution, obtain an expression for i(0) by substituting 0 for . Also obtain an expression for i() by substituting  for in equation (7). Using this expression for i() in equation (6), obtain i(2) by letting  = 2 . Since i(0) = i(2), we can obtain A from equation (8). In equation (8), the terms containing constant A are grouped on the left-hand side of equation and the other terms on the right-hand side.

The operation of the circuit can be simulated as shown below. During 0 <  <  , the expression for current is presented as equation (9). During  <  < 2 , the expression for current is shown as equation (10).

Computer simulation

We simulated the project using various computer simulation techniques, the soft form is also provided

MATLAB Simulation

Software Code:

%PROJECT TITLE:

%DESIGN AND IMPLEMENTATION OF HALF WAVE RECTIFIER

disp(‘%%%%%%%%%%%%%%%%%% POWER ELECTRONICS PROJECT %%%%%%%%%%%%%%%%%%%%%’);

disp(‘%%%%%%%%%%%%%%%%% DESIGN AND IMPLEMENTATION OF %%%%%%%%%%%%%%%%%%%’);

disp(‘%%%%%%%%%%%%%%% SINGLE PHASE HALF WAVE RECTIFIER %%%%%%%%%%%%%%%%%’);

disp(‘%%%%%%%%%%%%%%%%%%%%%%%%%%%%%%%%%%%%%%%%%%%%%%%%%%%%%%%%%%%%%%%%%%’);

disp(‘%%%%%%%%%%%%%%%%%%%%%%%%%%%%%%%%%%%%%%%%%%%%%%%%%%%%%%%%%%%%%%%%%%’);

disp(‘%%%%%%%%%%%%%%%%%%%%%%%%%%%%%%%%%%%%%%%%%%%%%%%%%%%%%%%%%%%%%%%%%%’);

disp(‘%%%%%%%%%%%%%%%%%%%%%%%%%%%%%%%%%%%%%%%%%%%%%%%%%%%%%%%%%%%%%%%%%%’);

disp(‘ENTER REQUIRED DESIGN PARAMETERS…’)

%PEAK VOLTAGE: Vp IN VOLTS

peakV=input(‘ENTER PEAK VOLTAGE IN VOLTS: ‘);

%CIRCUIT OPERATI0N FREQUENCY freq (Hz)

freq=input(‘ENTER OPERATING FREQUENCY IN Hz: ‘);

%LOAD INDUCTANCE L(mH)

L=input(‘ENTER LOAD INDUCTANCE IN mH: ‘);

%LOAD RESISTANCE R(Ohms)

R=input(‘ENTER LOAD RESISTANCE IN ohm: ‘);

%Setting the required parameters

w=2.0*pi*freq;

angle=atan(w*L/R);

Idc =0.318*peakV/R;

Vdc=0.318*peakV;

X=w*L/1000.0;

if (X<0.001) X=0.001; end;

Z=sqrt(R*R+X*X);

tauInv=R/X;

loadAng=atan(X/R);

A1=peakV/Z*sin(loadAng);

A2=peakV/Z*sin(pi-loadAng)*exp(-pi*tauInv);

A3=(A1+A2)/(1-exp(-2.0*pi*tauInv));

Ampavg=0;

AmpRMS=0;

dccur =0;

dcvolt=0;

Pdc = 0;

for n=1:360;

theta=n/180.0*pi;

X(n)=n;

if (n<180)

cur=peakV/Z*sin(theta-loadAng)+A3*exp(-tauInv*theta);

Ampavg=Ampavg+cur*1/360;

AmpRMS=AmpRMS+cur*cur*1/360;

else

A4=peakV/Z*sin(pi-loadAng)*exp(-(theta-pi)*tauInv);

cur=A4+A3*exp(-tauInv*theta);

Ampavg=Ampavg+cur*1/360;

AmpRMS=AmpRMS+cur*cur*1/360;

end;

if (n<180)

Vind(n)=peakV*sin(theta)-R*cur;

Vout(n)=peakV*sin(theta);

diode2cur(n)=0;

diode1cur(n)=cur;

dcvolt = sqrt(Vout(n))/2;

else

Vind(n)=-R*cur;

Vout(n)=0;

diode2cur(n)=cur;

diode1cur(n)=0;

end

Vrms=peakV/2;

Irms=Vrms/R;

Is1=Irms;

iLoad(n)=cur;

dccur = sqrt(iLoad(n))/2;

end;

disp(‘SINGLE PHASE HALF WAVE RECTIFIER PERFORMANCE PARAMETERS’);

Pdc = Vdc*Idc;

disp(‘1: The Average DC Power is…’);

disp(Pdc);

Pac = Vrms*Irms;

disp(‘2: The Average AC Power is…’);

disp(Pac);

eff=Pdc/Pac;

disp(‘3: THE PERCENTAGE RECTIFICATION RATIO OF THE RECTIFIER…’);

disp(eff);

Vac=sqrt(Vrms^2-Vdc^2);

disp(‘4: The Effective Value Of AC Componenet of Output Voltage is…’);

disp(Vac);

FF=Vrms/Vdc;

disp(‘5: The Form Factor is…’);

disp(FF);

RF=Vac/Vdc;

disp(‘6: The Ripple Factor is…’);

disp(RF);

TUF=Pdc/(Vrms*Irms);

disp(‘7: The Transformer Utilization Factor is…’);

disp(TUF);

DF=cos(angle);

disp(‘8: The Displacement Factor is…’);

disp(DF);

HF=sqrt((Irms/Is1)-1);

disp(‘9: The Harmonic Factor is…’);

disp(HF);

PF=(Is1/Irms)*cos(angle);

disp(’10: The Power Factor is…’);

disp(PF);

CF=peakV/(R*Irms);

disp(’11: The Crest Factor is…’);

disp(CF);

%Plotting Corresponding input and Output Currents and Voltages

plot(X,iLoad,’m’)

title(‘The Load current’)

xlabel(‘degrees’)

ylabel(‘Amps’)

grid

pause

plot(X,Vout,’r’)

title(‘Voltage at cathode’)

xlabel(‘degrees’)

ylabel(‘Volts’)

grid

pause

plot(X,Vind,’b’)

title(‘Inductor Voltage’)

xlabel(‘degrees’)

ylabel(‘Volts’)

grid

pause

plot(X,diode1cur,’m’)

title(‘Diode 1 current’)

xlabel(‘degrees’)

ylabel(‘Amps’)

grid

pause

plot(X,diode2cur,’r’)

title(‘Diode 2 current’)

xlabel(‘degrees’)

ylabel(‘Amps’)

grid

Sample Run:

%%%%%%%%%%%%%%% POWER ELECTRONICS PROJECT %%%%%%%%%%%%%%%%%%

%%%%%%%%%%%%%%% DESIGN AND IMPLEMENTATION OF %%%%%%%%%%%%%%%

%%%%%%%%%%%%% SINGLE PHASE HALF WAVE RECTIFIER %%%%%%%%%%%%%

%%%%%%%%%%%%%%%%%%%%%%%%%%%%%%%%%%%%%%%%%%%%%%%%%%%%%%%%%%%%

%%%%%%%%%%%%%%%%%%%%%%%%%%%%%%%%%%%%%%%%%%%%%%%%%%%%%%%%%%%%

%%%%%%%%%%%%%%%%%%%%%%%%%%%%%%%%%%%%%%%%%%%%%%%%%%%%%%%%%%%%

%%%%%%%%%%%%%%%%%%%%%%%%%%%%%%%%%%%%%%%%%%%%%%%%%%%%%%%%%%%%

ENTER REQUIRED DESIGN PARAMETERS…

ENTER PEAK VOLTAGE IN VOLTS: 110

ENTER OPERATING FREQUENCY IN Hz: 50

ENTER LOAD INDUCTANCE IN mH: 1000

ENTER LOAD RESISTANCE IN ohm: 1000


%%%%%%%%%%%%%%%%%%%%%%%%%%% OUTPUT %%%%%%%%%%%%%%%%%%%%%%%%%%%%%%%

SINGLE PHASE HALF WAVE CONTROLLED RECTIFIER PERFORMANCE PARAMETERS

%%%%%%%%%%%%%%%%%%%%%%%%%%%%%%%%%%%%%%%%%%%%%%%%%%%%%%%%%%%%%%%%%%

1: The Average DC Power is…

1.2236


2: The Average AC Power is…

3.0250


3: The Efficiency Of Rectifier is…

0.4045


4: The Effective Value Of AC Componenet of Output Voltage is…

42.4429


5: The Form Factor is…

1.5723


6: The Ripple Factor is…

1.2133


7: The Transformer Utilization Factor is…

0.4045


8: The Displacement Factor is…

0.0032


9: The Harmonic Factor is…

0


10: The Power Factor is…

0.0032


11: The Crest Factor is…

2


OUTPUTS:

The Voltage waveform at output or at the cathodes of both the diodes:

The current waveform at output or Load current:

The voltage waveform across the inductor:

Diode1 current waveform:

Diode2 current waveform:

MATLAB Simulink (Time Domain Implementation)

Following is the Matlab Simulink Implementation in time domain:


OUTPUTS:

The Voltage waveform at output or at the cathodes of both the diodes

The current waveform at output or Load current

The voltage waveform across the inductor

Diode1 current waveform

Diode2 current waveform

MATLAB Simulink(Frequency Domain)

Following is the Matlab Simulink Implementation in Frequency domain:

Output Voltage Waveform
Output Current Waveform

MULTISIM Implementation:


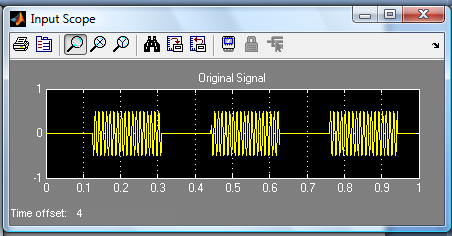
The waveform of voltage at the Input

The waveform of voltage at the cathode of both diodes i.e. Output voltage


The waveform of voltage across the inductor

This is another simple interfacing circuitry with the microcontroller. In this circuit we interface the mechanical relay with the microcontroller. Relay interfacing is very important and common type of interfacing which occurs in most of the microcontroller projects. Relay is basically electrically operated switch and act as a switching device to turn on and off the devices connected to the microcontroller, as well as provide isolation between the microcontroller and the operating device, assume we have to turn on and off the high voltage load then we cannot directly interface the device to the microcontroller as it can burn the microcontroller so we use Relay as a switch and isolator. We can control the high voltage devices with low power control signal. Logical operation can also be obtained by connecting relays in different combinations, In the early ages before the invent of vacuum tubes and transistor relays wee used as an logical element in the early computers.

The working mechanism of the relay is very simple. Relay works electromagnetically when the control signal given to the relay the magnetic flux produces in its coil either made the contacts to get apart or connect with each other. There are many types of Relay available differs in their type of application and working for example:

Latching relay

Reed relay

Mercury-wetted relay

Polarized relay

Machine tool relay

Contactor relay

Solid-state relay

Solid state contactor relay

Buchholz relay

Forced-guided contacts relay

Overload protection relay

etc

In our circuit we are using Latch Relay.


For circuit diagram and the coding click the link given below:

Download attachment

16 Segment display is a alphanumeric display segment which helps us to display the English, Thai, Persian and other characters. These segments are now use in many applications and the gadgets having display panel like calculators,telephone Caller ID units, gymnasium equipment, VCRs, car stereos, microwave ovens, slot machines, DVD players and other embedded systems. This circuitry is another simple interfacing of the 16 segment with the microcontroller. Interfacing of the various elements is the basics of the beginners of microcontroller learners.

In this circuit we use microcontroller AT89C51 and 16 segment display. We display the characters from (A to Z) first and then numbers (0 to 9).

For circuit diagram and the coding click the link given below:

Download attachment

Show the following patterns on the 7 Segment display

1) Ascending Order (0-9)

2) Descending Order (9-0)

3) Odd numbers

4) Even numbers


This is another simple circuitry to interface the Seven segment to the microcontroller. It is one of the basic circuits which helps the beginners to understand the interfacing of microcontroller with basic elements. In this project we use microcontroller AT89C2051 and 7 segment common anode.

7 Segment consist of 8 LEDs connected in a way that they can display the numbers from zero to nine (0 to 9) with a decimal point . There are basically two types of seven segments Common Anode Seven Segment and Common Cathode Seven Segment, In common anode we connect the common terminal of  the seven segment to 5 volts and to glow any segment we connect it to the ground, while in the common cathode configuration we connect the common terminal of the seven segment to the ground voltage and to glow any segment we connect it to the 5 volts.

In this circuit we first display the number in ascending order then in descending order then the odd numbers and finally the even numbers on the seven segment display

For circuit diagram and the coding click the link given below:

Download attachment

This is another simple circuitry to interface the Seven segment to the microcontroller. It is one of the basic circuits which helps the beginners to understand the interfacing of microcontroller with basic elements. In this project we use microcontroller AT89C2051 and 7 segment common anode.

7 Segment consist of 8 LEDs connected in a way that they can display the numbers from zero to nine (0 to 9) with a decimal point . There are basically two types of seven segments Common Anode Seven Segment and Common Cathode Seven Segment, In common anode we connect the common terminal of  the seven segment to 5 volts and to glow any segment we connect it to the ground, while in the common cathode configuration we connect the common terminal of the seven segment to the ground voltage and to glow any segment we connect it to the 5 volts.

This circuit display the digits from zero to nine on the seven segment.


For circuit diagram and the coding click the link given below:

Download attachment

Abstract:

Digital signal processing is the fundamental building block of modern digital developments. All types of digital innovations have been possible due to DSP. One of the first and most widely used application of digital signal processing is in the field of modern digital communication means. Due to exact linear phase it has become possible for engineers to design more reliable systems. DSP has deep impacts on modern communication systems. A general DSP processor simply performs functions of addition, multiplication and delay with necessary repetition.


Introduction:

Digital signal processing is extensively used in modern digital applications. As compared to analog signal processing, DSP serves us many benefits like phase linearization, easy storage, fast signal processing, cost effective, low frequency operation and general usage for any type of application. It has revolutionized the modern wired and wireless communication systems. Since a DSP processor simply perform repeated addition, multiplication and delay operations  during processing of information, so in this project we have demonstrated these basic operations by implementing them in MATLAB.

Objectives of the Project:

  • To learn the basic operation sequence of DSP processor.
  • Algorithmic approach to implement DSP basic operations.
  • A generalized MATLAB based implementation.

Sample Run:

%%%%%%%%%%%%%%%%%% DIGITAL SIGNAL PROCESSING PROJECT %%%%%%%%%%%%%%%
%%%%%%%%%%%%%%%%%%%% SOFTWARE IMPLEMENTATION OF %%%%%%%%%%%%%%%%%%%%
%%%%%%%%%%%%%%% DIGITAL SIGNAL PROCESSOR USING MATLAB %%%%%%%%%%%%%%
%%%%%%%%%%%%%%%%%%%%%%%%%%%%%%%%%%%%%%%%%%%%%%%%%%%%%%%%%%%%%%%%%%
%%%%%%%%%%%%%%%%%%%%%%%%%%%%%%%%%%%%%%%%%%%%%%%%%%%%%%%%%%%%%%%%%%
PROJECT BY:
IRZAM SHAHID
ANSAR SHARIF
M.NAEEM KHAN
FAHAD SABAH
%%%%%%%%%%%%%%%%%%%%%%%%%%%%%%%%%%%%%%%%%%%%%%%%%%%%%%%%%%%%%%%%%%
%%%%%%%%%%%%%%%%%%%%%%%%%%%%%%%%%%%%%%%%%%%%%%%%%%%%%%%%%%%%%%%%%%

T1 =

Columns 1 through 15

0     1     2     3     4     5     6     7     8     9    10    11    12    13    14

Columns 16 through 30

15    16    17    18    19    20    21    22    23    24    25    26    27    28    29

Columns 31 through 45

30    31    32    33    34    35    36    37    38    39    40    41    42    43    44

Columns 46 through 51

45    46    47    48    49    50

T2 =

Columns 1 through 15

0     1     2     3     4     5     6     7     8     9    10    11    12    13    14

Columns 16 through 30

15    16    17    18    19    20    21    22    23    24    25    26    27    28    29

Columns 31 through 45

30    31    32    33    34    35    36    37    38    39    40    41    42    43    44

Columns 46 through 51

45    46    47    48    49    50

Please enter delay…


For simulation code click the link given below

Download attachment

Envelope Detection

This demo implements two common methods of envelope detection and tests them with a sample speech signal and a modulated sine wave.

The envelope of a signal is the outline of the signal. It can be think of an envelope detector as a system that connects all of the peaks in the signal. Envelope detection has numerous applications in Signal Processing and Communications, including amplitude modulation (AM) detection.

Method 1: Squaring and Low Pass-Filtering


Method 2: The Hilbert Transform

Squaring and Low Pass-Filtering

The first method works by squaring the input signal and sending it through a low-pass filter. Squaring the signal effectively demodulates the input by using itself as the carrier wave. This means that half the energy of the signal is pushed up to higher frequencies and half is shifted towards DC. The envelope can then be extracted by keeping all the DC low-frequency energy and eliminating the high-frequency energy. In this demo, a simple minimum-phase low-pass filter is used to get rid of the high-frequency energy.

In order to maintain the correct scale, two more operations are included. The first is to place a gain of 2 on the signal. Since we are only keeping the lower half of the signal energy, this gain boosts the final energy to match its original energy. Finally, the square root of the signal is taken to reverse the scaling distortion from squaring the signal.

This method is useful because it is very easy to implement and can be done with a low-order filter, minimizing the lag of the output.

Method 2: The Hilbert Transform

The second method works by creating the analytic signal of the input by using a Hilbert transformer. An analytic signal is a complex signal, where the real part is the original signal and the imaginary part is the Hilbert transform of the original signal.

The Hilbert transform of the signal is found using a 32-point Parks-McClellan FIR filter. The Hilbert transform of the signal is then multiplied by i (the imaginary unit) and added to the original signal. The original signal is time-delayed before being added to the Hilbert transform to match the delay caused by the Hilbert transform, which is one-half the length of the Hilbert filter.

The envelope of the signal can be found by taking the absolute value of the analytic signal. In order to eliminate ringing and smooth the envelope, the result is subjected to a low-pass filter.

Envelope Detector Model

The all-platform floating-point version of the model is shown below. When we run the demo, we will see the original signal and the results of both envelope detectors.

Envelope Detector Results

This demo shows the results of the two different envelope detectors for two different types of input signals. The input choices are a sample speech signal or a 100 Hz sine wave that turns on and off.

The model has a switchable input and two outputs which are routed to scopes for easy viewing. If a signal is not visible, double-click on the Scope block to open it.

The input scope plot shows the original signal. The signal lasts a total of 5 seconds, with 1 second of data being shown at a time.


The first output scope plot shows the output of the first envelope detector. This is the result of squaring the original signal and sending it through a low-pass filter. You can clearly see that the envelope was successfully extracted from the speech signal.

The second output scope plot shows the output of the second envelope detector, which employs a Hilbert transform. Though the output of this envelope detector looks very similar to the first method.


For Simulink model and the block diagram of the above project click the link below:

Download attachment

Blinking LEDs in Sequence:

This is another basic introductory circuit of micrcontroller. In this circuit we turn on and off the leds in sequence bu using microcontroller AT89C2051, one LED is on at one time then after some delay it becomes off and another LED turns on and so on. There are two ways to do this sequence in assembly language. First way is to turn on one port and keep other ports off at one time then turn on second port and keep other ports off and so on. Second way to do it is by load the value 01111111(07FH in hexadecimal) to the register and then rotating the value in the register, every time after one rotation the rotated value is moved to the port 1.

For circuit diagram and the coding click the link given below:

Download attachment